Loading...
Loading...
Loading...
Loading...
Loading...
Loading...
Loading...
Technical and non-technical users can curate content and data using the TerminusCMS dashboard
TerminusCMS automatically generates document editing frames from the schema. Users can then add, edit, and delete content and data as needed.
First, navigate to the document explorer from the left menu -
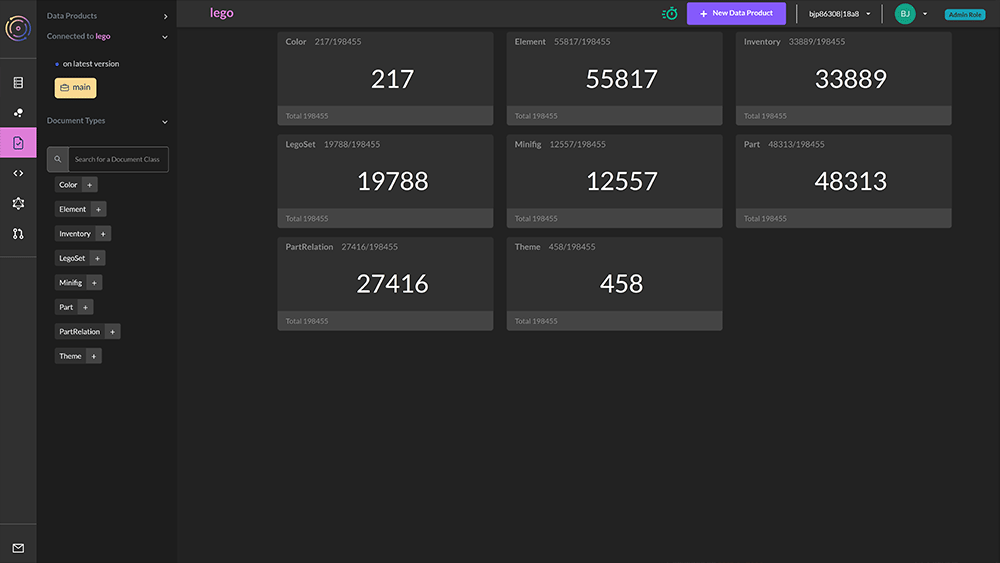
The document explorer lists all of the document types within the schema and displays how many of each there are.
The left-hand menu also details the document names with the ability to search for something specific.
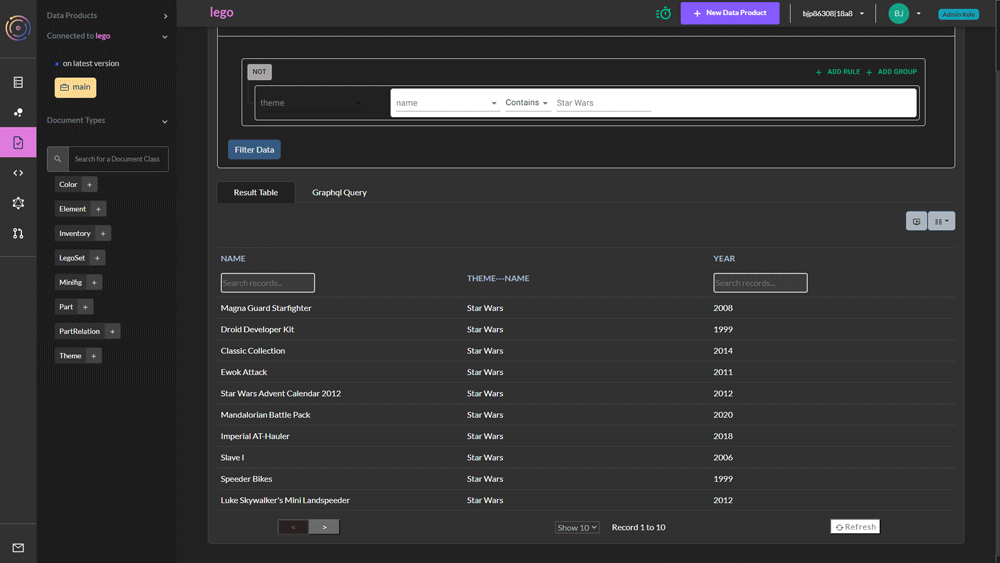
Clicking on a document type displays a list of matching documents -
The document table allows users to -
Choose the properties to display in the table
Search properties
Perform advanced filters
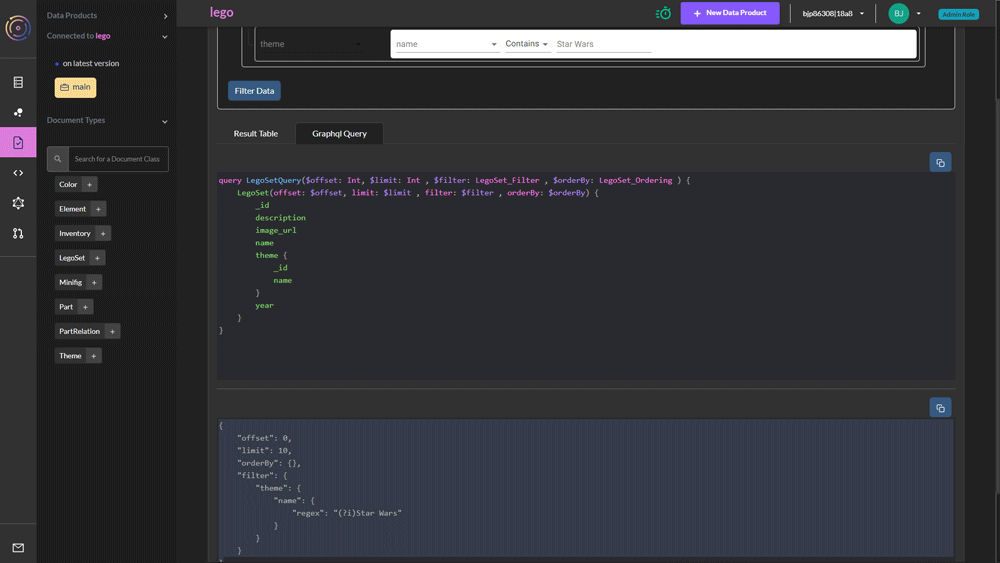
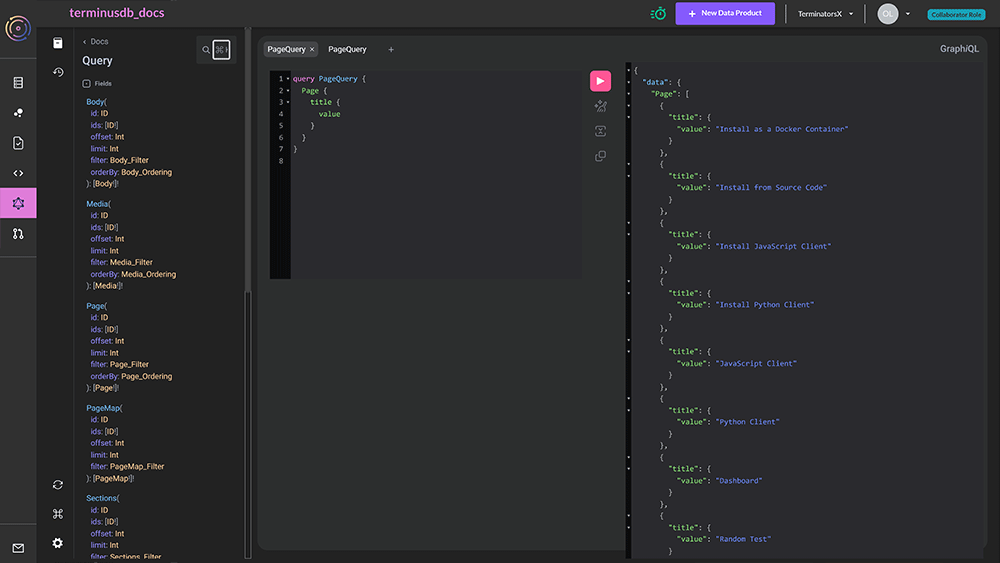
The GraphQL tab provides front-end developers with an overview of the GraphQL query structure of the document and includes JSON-LD details for applied filters -
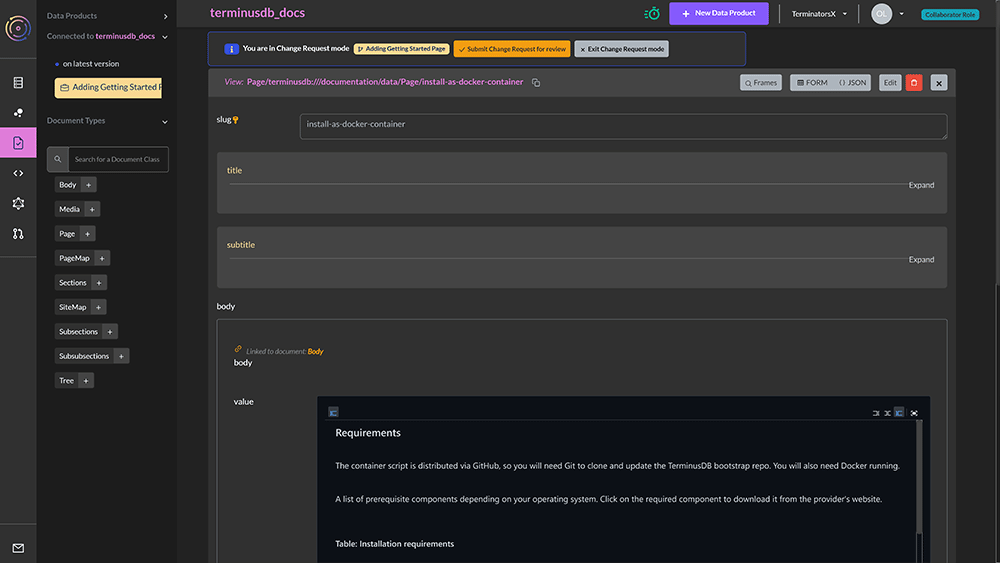
In order to make changes to content and data, users need to create a change request. This is automated when selecting to edit, delete, or add content. Please refer to the change request workflows section for full details.
A change request dialogue box opens and prompts the user to add a change request title and description. They can then go and make changes.
To add content and data, either click on the + symbol next to the document type name from the left menu or select the 'add new' button from the document explorer page -
The document editing frame is generated from the schema and this includes things like -
Validation
Localization
Markdown
Property types such as data, currency, and lists.
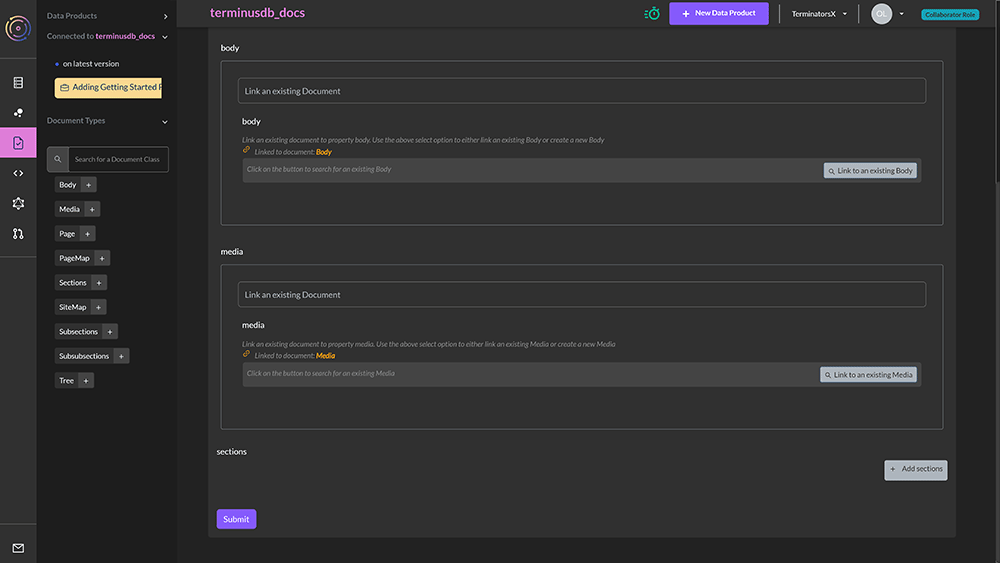
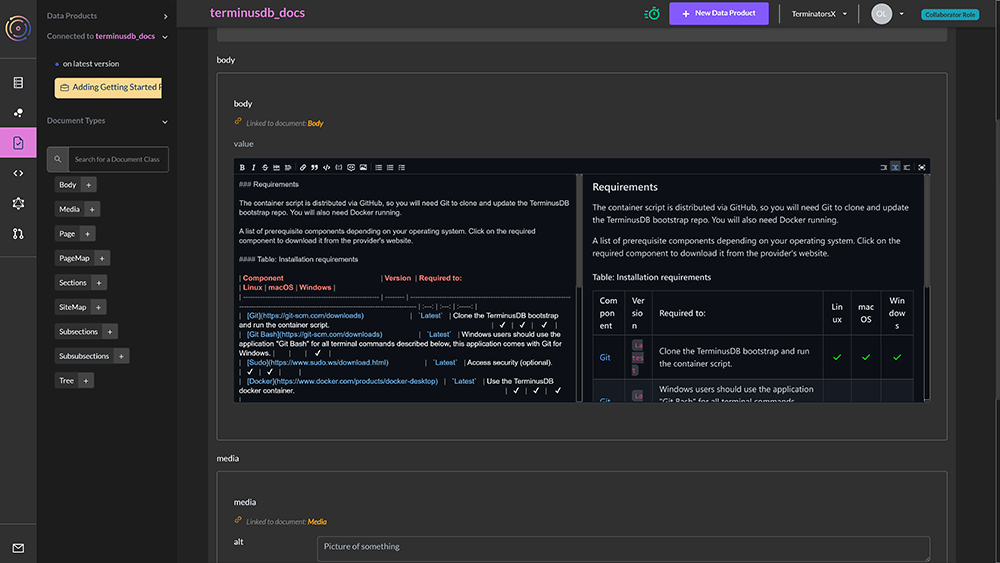
The editing interface can also include links to other documents and subdocuments and this is all specified in the schema. The example below is a test project working on the TerminusDB documentation and features links to other document types.
A page for example can link to sections and a body so the same piece of content can be used in multiple locations. The schema can also specify that the linked document types unfolded so they display ready for editing within a piece of content -
For details on how to specify markdown, unfolded, and other properties within the schema, please read the schema reference guide.
To edit a document, select the document to edit by clicking on it from the document explorer. This will open up the document for editing.
Make the changes and ensure to press select submit to ensure changes are saved.
To delete a document, select the red bin icon. A warning message will display to confirm the deletion.
An overview of the GraphQL and WOQL playgrounds in the TerminusCMS dashboard
TerminusCMS features a query playground for GraphQL and WOQL.
TerminusCMS includes GraphiQL to experiment and test queries. It automatically generates the GraphQL schema based on the project's schema.
It includes -
List of root types within the project
Autofill to aid query construction
Pretty print
Results panel
Error reporting
For more details about the types of queries available with GraphQL, such as path queries, filters, and arguments, please refer to the GraphQL reference guide.
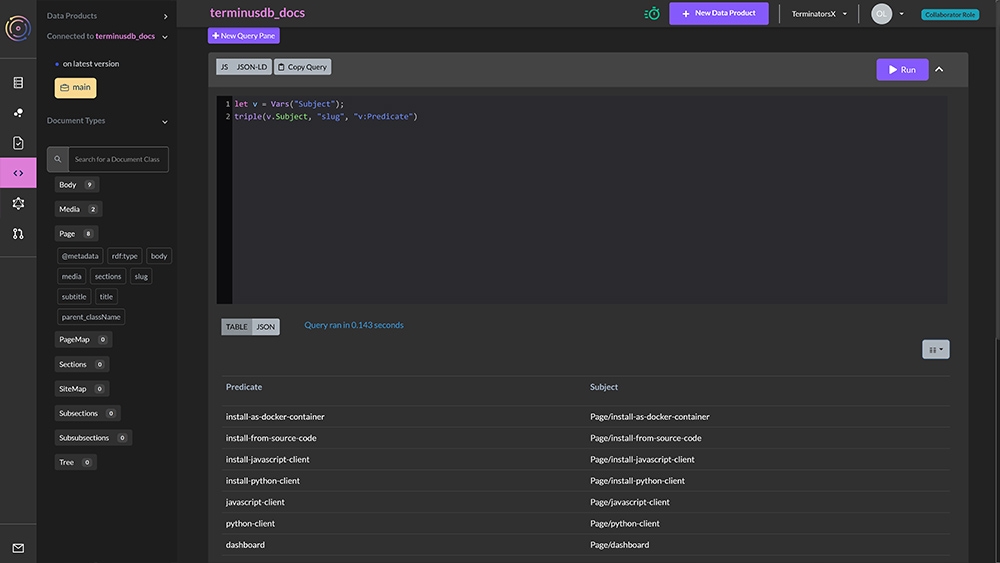
Web Object Query Language (WOQL) is a powerful and sophisticated query language which allows you to concisely express complex patterns over arbitrary data structures.
The playground enables users to build WOQL queries to experiment and test. Users can also -
View query as JSON-LD format
Copy the query
See results
Select query parameters based on the schema (left side of the screen)
Please see these other resources for understanding and using WOQL -
This page provides an overview of the TerminusCMS dashboard to help you navigate its features.
TerminusCMS includes many features to build content infrastructures for complex environments. This product tour aims to provide you with an understanding of how to navigate the product and get started on your projects.
Verify your email address by clicking on the link emailed to you and logging in.
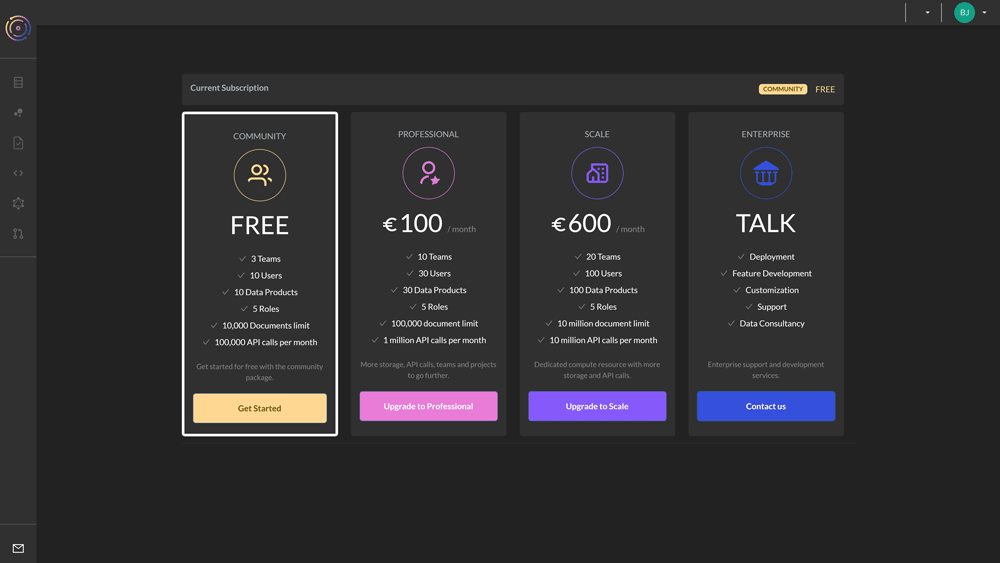
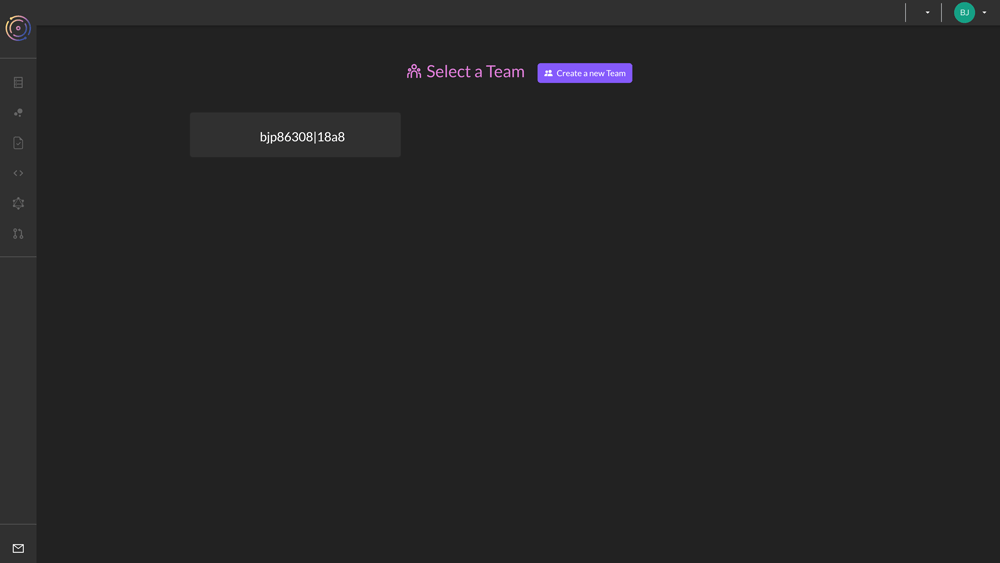
Click get started on the Community Package and then select the automatically generated team.
From here, clone one of the demo projects to play around with -
Sign up for TerminusCMS for free at: .

Manage your teams and users in the TerminusCMS dashboard
TerminusCMS generates a team based on your registration credentials.
The pricing page is the first screen displayed when logging in for the first time, click on 'Get Started' under the community package. The next screen is the teams home page that lists all of the teams a user belongs to.
Create a new team or select the autogenerated team. All of the teams a user is a member of will appear on the team's home page. Switch between teams using the dropdown from the top menu.
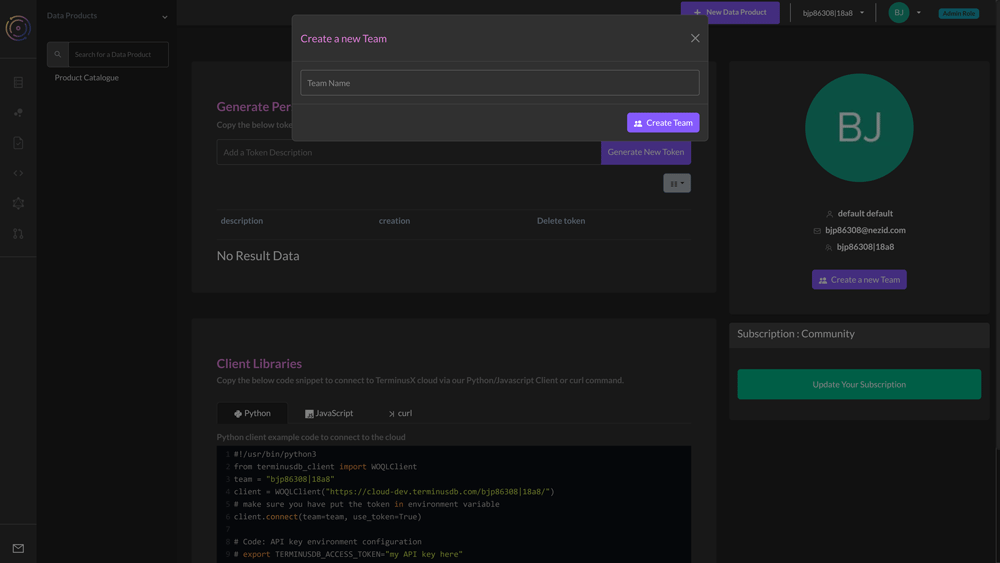
To create a new team from the top menu:
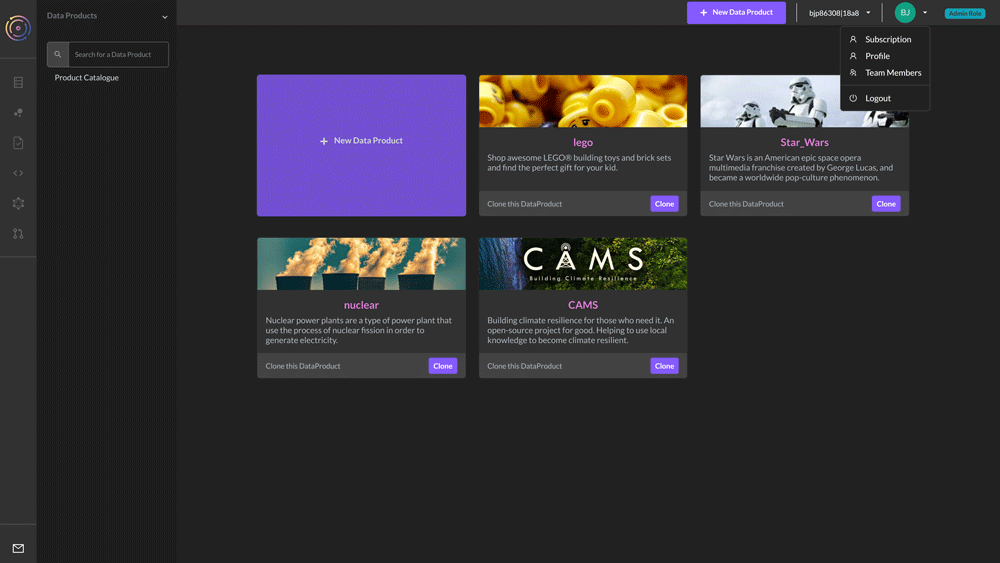
Click the arrow next to the profile icon in the top right corner.
Select profile.
From the resulting window, select ‘Create a new team’
Name the team - note that no two team names can be the same.
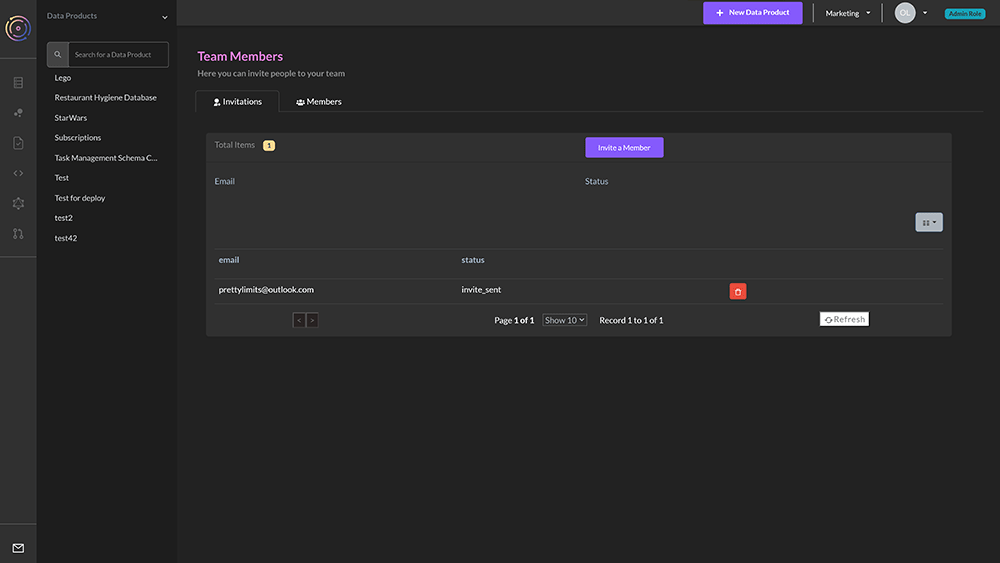
To invite team members and manage the team, do the following:
Click the arrow next to your profile icon in the top right corner.
Select 'Team Members'.
In the following screen, select 'Invite a Member'.
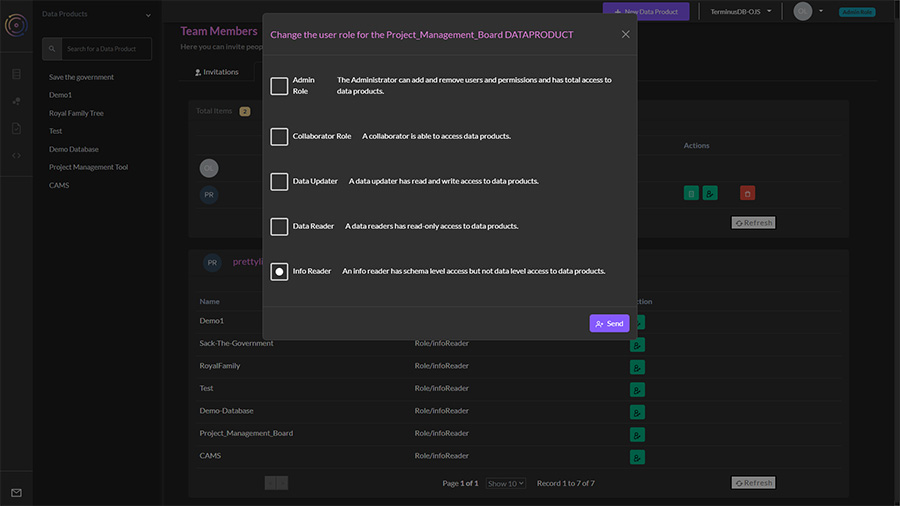
In the pop-up window, enter the user’s email address and select one of the following access permissions - this will be applied to team-level permissions so will apply to all data products within your team. If you want to only give read-write access to a specific data product, it makes sense to give the user low-level permissions and assign higher permissions for that data product only - we will explain this next.
Admin - can add and remove users and permissions and has total access to data products.
Collaborator - Able to access data products.
Data Updater - Read and write access to data products.
Data Reader - Read-only access to data products. Info Reader -
Schema-level access but not data-level access.
The user will be sent an email with a link they need to click (if they don’t receive it, tell them to check their spam folder).
When the user has accepted the invitation, their details will display within the Team Members section.
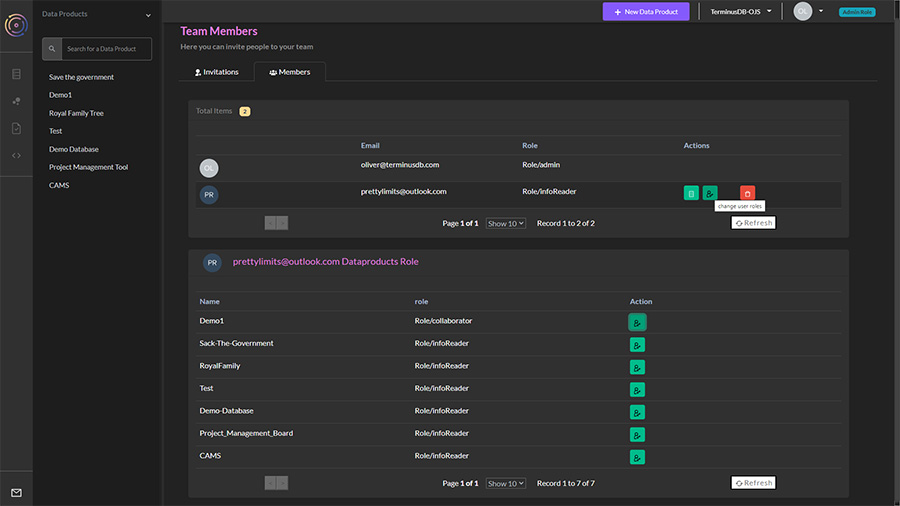
To edit the role given to a user:
Navigate to the Team Members section from the profile dropdown.
Find the user to change from the list and click on the second icon.
From the pop-up window, select the new role to give them.
To delete a user from a team, do the same as above, but select the third icon in red.
Hover over the icons for information about what they do.
Grant different permissions for different data products/projects. To do this do the following:
Navigate to the Team Members section from the profile dropdown.
Find the user to add specific data product permissions for and click on the first icon.
The resulting table below will list all of the data products in the team.
Choose the data product to change the user’s role for by clicking on the edit permissions icon.
Choose from the list of permissions
Users can only have permissions higher than the team permissions, so if someone needs read/write permissions for only one data product, ensure that the team permissions are set at a lower level.
How to add and manage projects/data products within TerminusCMS
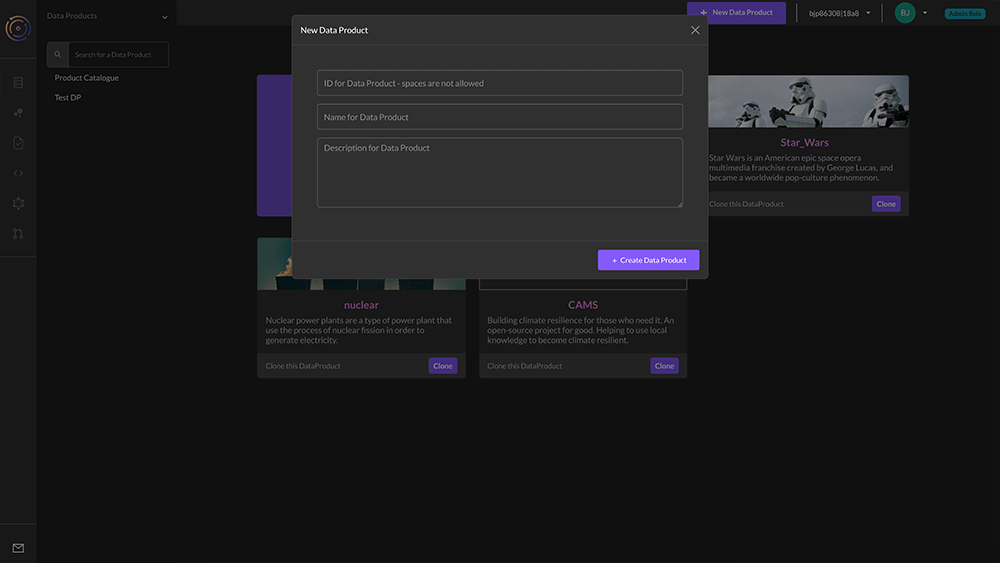
Creating a data product by -
Select ‘New Data Product’
Give it an ID (only alphanumeric characters and underscores are allowed)
Name it something meaningful
Give it a description so that team members can see its purpose.
All projects/data products within a team are listed on the left.
Select the data product by clicking it.
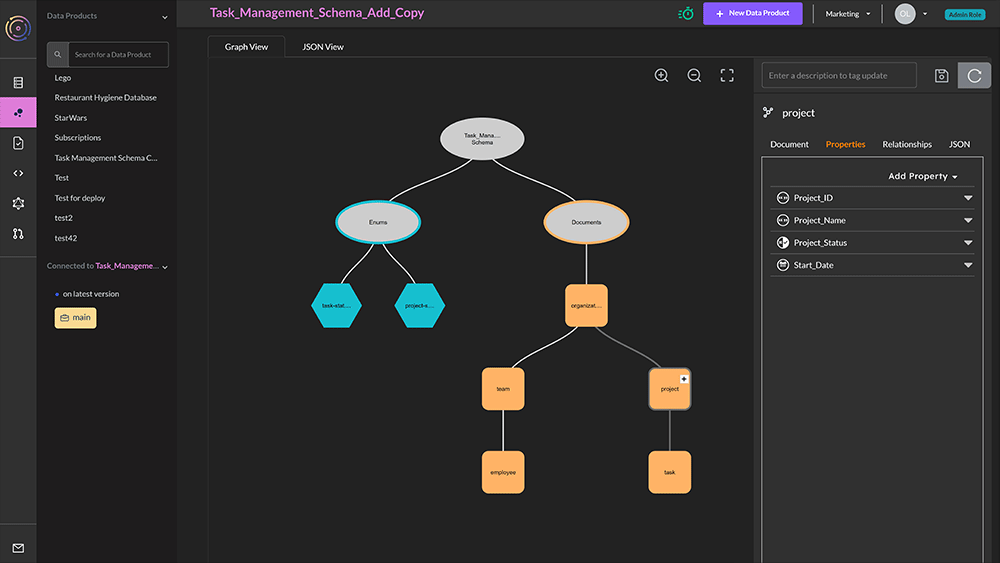
Build a project's schemas using the user interface or develop it in code.
For a detailed overview of the schema language, which is based on JSON syntax refer to the schema reference guide.
Choose Data Product Model from the lefthand menu - the second icon.
In the window, you will see an oval called your data product name schema. Click on the oval and select the + symbol.
Add a document or enum.
JSON documents form the nodes of the graph
Enumerated types are a set of possible choices
Select add document.
On the right, you will see a set of options to define the document:
Give it a unique ID (no spaces)
Define the document key, choose from (this blog will help you decide what key to use):
Lexical (need to set up document properties first)
Hash (need to set up document properties first)
Random
ValueHash
Add the document properties, choose from:
Enum - Need to create the enums before this option becomes available
Numeric
String
Geo
Temporal
Boolean
JSON
Link - building the relationships in the graph
On the next tab, you can see the relationships in the graph, this will show links between objects. You can also set the document as a parent/child of another document.
The final tab when creating the document shows it in its JSON format.
Save your document by clicking on the disk icon.
Creating subdocuments and enums can be achieved in much the same way.
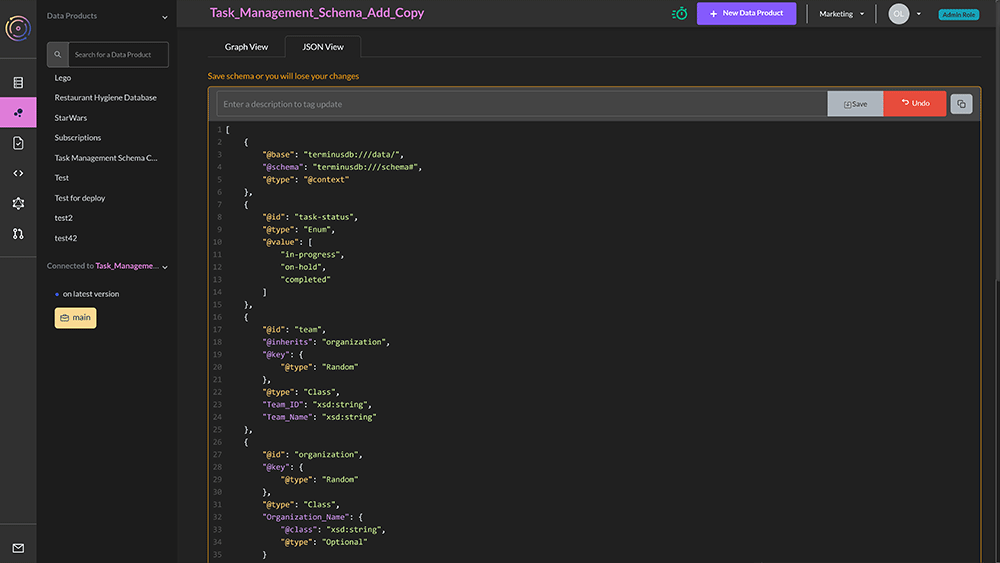
Using a visual editor to build a schema isn’t for everybody. Users can also design schema as code.
Choose Data Product Model from the lefthand menu - the second icon.
In the window, there are two tabs, ‘Graph View’ and ‘JSON View’.
Select JSON View.
Click on the edit icon.
Add or copy and paste the JSON schema into the window and save.
The schema should now display in the graph view.
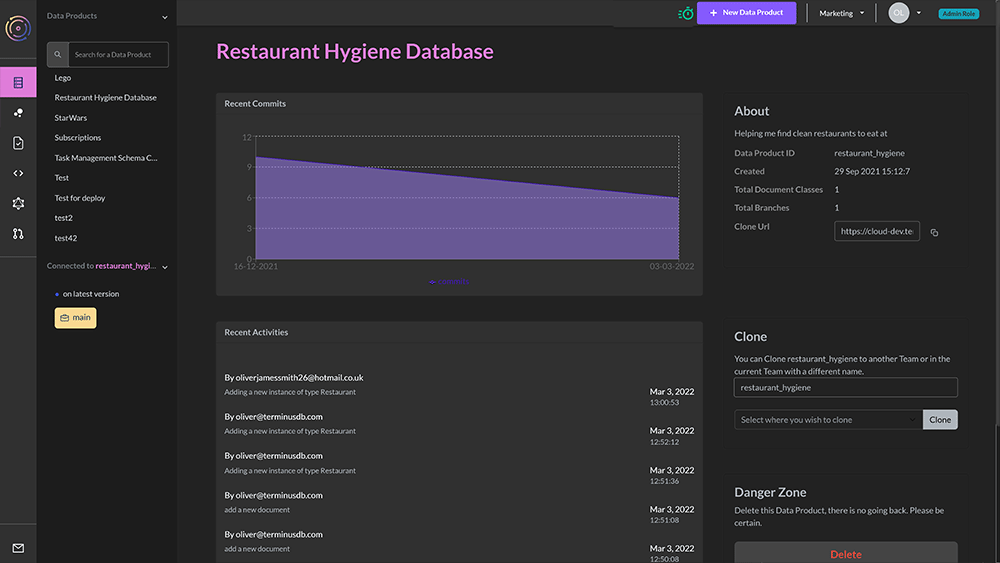
TerminusCMS has collaboration and version control features. Some of these are available via the dashboard. From the left select the first icon to navigate to your project home page -
On this page, you can -
See a snapshot of the latest activities.
See the project details.
Clone the project - name it and decide which team you want to clone it to.
Delete the project.
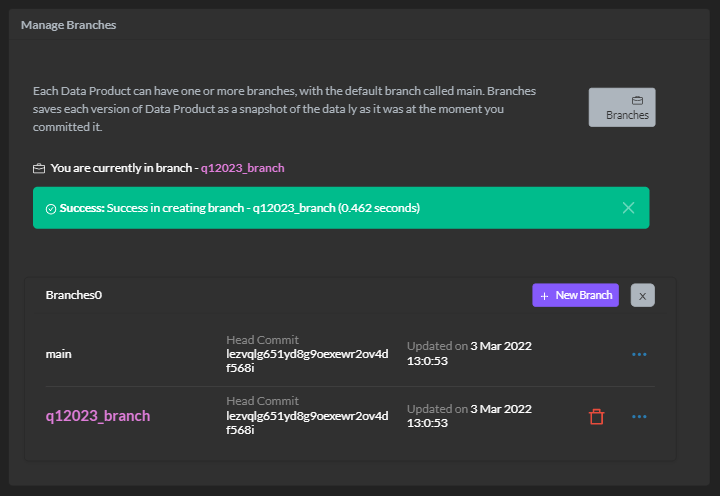
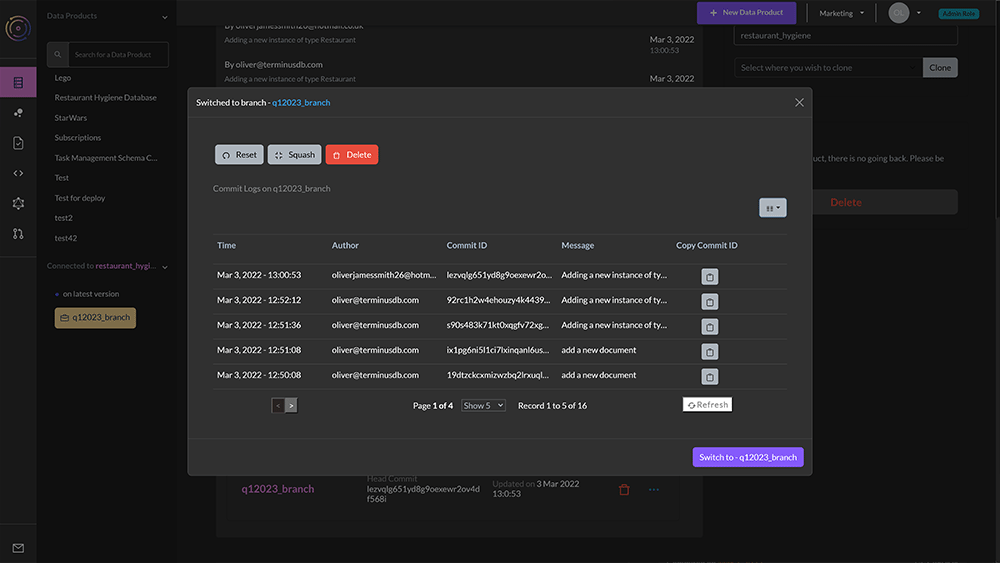
Branch the project - along with reset and squash.
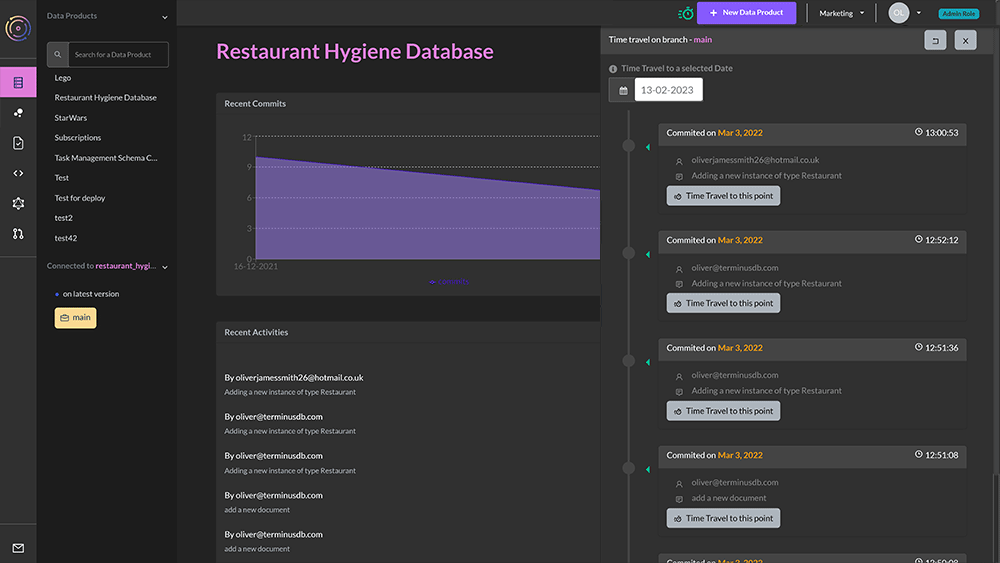
Time travel to any previous commit to inspect the project in the past.
At the bottom of the project home page is the branch button.
Each project can have one or more branches, the default is called main. Each branch contains a snapshot of the data as it was at the time of branching. This is useful for experimenting or providing data to other teams when you want to keep them away from main.
Users can reset a branch to a specific commit or can delete the commit history by squashing it. They do this by selecting the ellipsis symbol next to the branch and then following the prompts.
TerminusCMS enables users to reset the project database to a particular commit. To do this, scroll to the bottom of the project home page and click branches.
Select the ellipsis symbol next to main. Here users can reset to a specific commit, or delete the commit history by squashing it.
This page details how change request workflows function in TerminusCMS to enable safe collaboration
TerminusCMS features change request workflows to ensure that changes to data and content are made safely with reviews in place to check changes.
When someone goes to make a change to content and data, TerminusCMS automatically opens a change request. This is a branch of the database that does not impact main. Users can make one or many changes within the change request -
Users will see when they are in a change request. A banner with various options is included at the top of the page and there is also a notice on the left informing the user what they are connected to -
It is important to submit edits or additions in a change request. Without hitting the submit button, changes will not be saved to the change request.
When in a change request a user has three options -
Continue to make edits, deletions, and additions to the change request.
Exit the change request - This leaves the change request open and available to come back to at a later stage.
Submit the change request for review.
Change requests are managed from the change request screen.
The screen has four tabs -
Open - Open change requests that can be continued with or submitted for review.
Review - Change requests that have been submitted for review.
Merged - Previous approved commits to the database.
Rejected - Rejected change requests.
On the change request screen, select review. Change requests that users have submitted for review are listed in chronological order.
To review a change request, do the following -
Click the 'review' button for the corresponding change request.
The next screen has all of the details of the change request with two tabs -
The first is the diff view with drop-down options to display the changes that have been made.
The second is the messages tab, this displays the messages entered when creating and submitting the change request and can provide context.
Users can either accept or reject a change request and leave a message explaining their reasoning behind each.
Accepted change requests will move the change request into the merged tab - users are able to view the diff to see the changes of past commits.
Rejected change requests move into the rejected tab on the change request home screen.
In order to avoid changes being squashed by other users when multiple people make changes to data and content, TerminusCMS checks the database to see if there have been changes made before a user reviews and merges a change request.
In order to proceed. The user must rebase their change request to incorporate the latest changes into their own change request. A prompt tells the user what to do.
CTO, Gavin Mendel-Gleason, provides a demonstration of TerminusCMS showing off some of its features